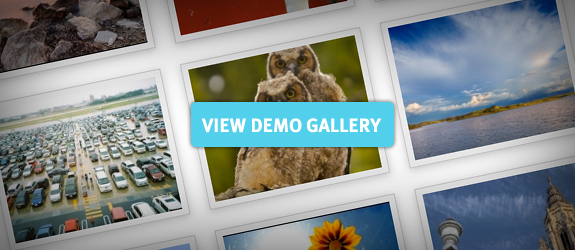
Create an Awesome Photo Gallery in Drupal 6
Create an Awesome Photo Gallery in Drupal 6
If you’ve had any experience with Drupal before you know it’s extremely powerful. It is a robust content management system, with thousands of contributed modules available for use. With this many modules at your fingertips it would seem that finding something as simple as a photo gallery would be a breeze. Think again...
Doing a search for the term “Photo Gallery” on Drupal.org returns 216 modules. In my experience there are only about 5 that are even worth mentioning. Most of them aren’t actual photo gallery solutions, just add-ons that are related to the keywords used.
My top 5 Photo Gallery Modules (in no particular order)
Now this is in no way a comparison of these modules, I just wanted to give you a few options from the get go. Now let’s jump into what I think is the best gallery solution for Drupal 6 as of the date of this post.
Modules needed for Drupal 6 Photo Gallery
In order to create an awesome photo gallery for Drupal 6 you will need to install the modules listed below. IMPORTANT: I am assuming you already know how to use CCK, Views & have a basic familiarity with Drupal.
- CCK
- Filefield
- ImageField
- ImageCache
- ImageAPI
- Nodereference URL
- Transliteration
- Token
- Views Attach
- Views
- Views Gallery (MOST IMPORTANT)
- Lightbox2
- Image FUpload
- Automatic Nodetitles
- Administration Menu
This module list might look daunting for just a simple photo gallery, but if you have developed any kind of Drupal site in the past you know that most of these modules are must haves. If you already have a functioning drupal site, then chances are half of these modules are probably already installed.
1. Download & enable required modules
Once you have downloaded all the required modules, go ahead and navigate to admin/build/modules to enable them. Some modules are dependent on other modules so they can’t be enabled until its dependents are enabled. There is a list of dependent modules directly to the right of each module on the modules page. Make sure they all get enabled for this to function correctly.
Advanced users only: A quicker way to enable modules is by using Drush, which is a command line for Drupal. We outlined how to install drush on shared hosting account in an earlier post.
2. Two content types are automatically created
Now that all modules are enabled, we can move on to configuration. As soon as you enable all of these modules you will notice that two new content types are created for you—Gallery and Image. Pretty self explanatory, but for the sake of this tutorial I will anyway.
Gallery Content Type - This is the container which holds the images you want to upload. (Ex: Flowers, Cars )
Image Content Type - This is the actual image that goes inside of the galleries. (Ex: Tulip, Lamborghini)
3. Create your first gallery
If you are using the Administration Menu, which I highly recommend, you would go to Content Management > Create Content > Gallery. I usually just fill in the title of the gallery, but you can include a description as well. Click save at the bottom.
The views gallery plugin automatically adds an “Add Photo” link on the gallery page, which is a big help.
4. Adding images to your gallery
There are two ways you can add an image to a gallery:
- Navigating to the Gallery’s page and choosing add photo.
- Going to Content Management > Create Content > Image and choosing a gallery in the drop down.
5. Configuring Views Gallery to allow bulk uploading of images
As you can see, this only allows you to upload one image at a time. In most cases, this in not acceptable as you may have a large amount of photos you want to add. I scoped around to find a solution for multi-image uploading that integrated with Views Gallery and I found a nice solution. The module is called Image FUpload, I listed this module as a required module at the beginning of this tutorial so you should already have this enabled.
In order for this module to function correctly you have to download SWFUpload from googles code base here: http://code.google.com/p/swfupload/downloads/list
Once you download the file, three files need to be added inside the module folder. The three files that you need to grab are:
- swfupload.js
- swfupload.queue.js
- swfupload.swf
Place these files in sites/all/modules/image_fupload/swfupload
If you are not sure that these files are in the correct place, then navigate to your Drupal status report and it will tell you if any of the files are missing.
A. Setting up the imagefield to use Widget Type Image FUpload
We need to edit the imagefield in the Image content type. Navigate to Content Management > Content Types > Edit Image > Manage Fields > Image. You will see at the very top the Label of the imagefield which should be Image and Widget type.
Right now the Widget type is set to Image, but we want to change it to Image FUpload, so click the Change Basic Information button. Now scroll down until you see Widget Type and choose Image FUpload from the drop down. Scroll to the bottom and click continue.
It will then warn you about adding two fields to one node type with Image FUpload field, just ignore it. It will also ask you if you want one image per node, or multiple Images per node.
- One image per node: Creates a new node for each image.
- Multiple images per node: Stores multiple images in a single node.
Chose number one if you have CCK fields or other data that is associated with the image, if not choose number two for simple photo galleries.
Click Save
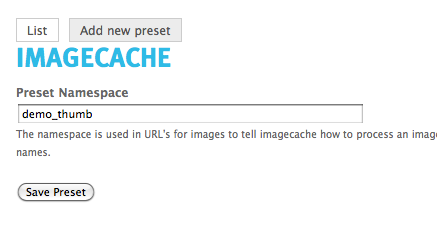
6. Creating Thumbnail using ImageCache
This is the part where you need to think ahead. Before you take this step, you need to know the exact dimensions of your custom thumbnail. You can always go back and change it, but it’s a good idea to get the dimensions correct from the start.
1. Navigate to Site Building > ImageCache > Add new preset
2. Enter a name for your thumbnail (Ex. demo_thumb) and click Save Preset
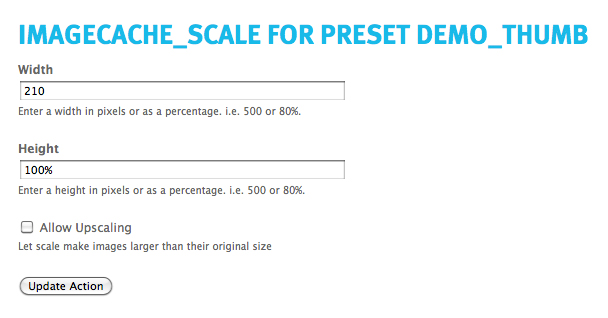
3. Scaling - Now click New Actions and then choose Add Scale. We are creating an action to scale the image down before we crop it to our desired dimensions. I usually go about 20-30px above my width, which for my thumbnail is 180px, so I chose 210 for the width and kept the height at 100%
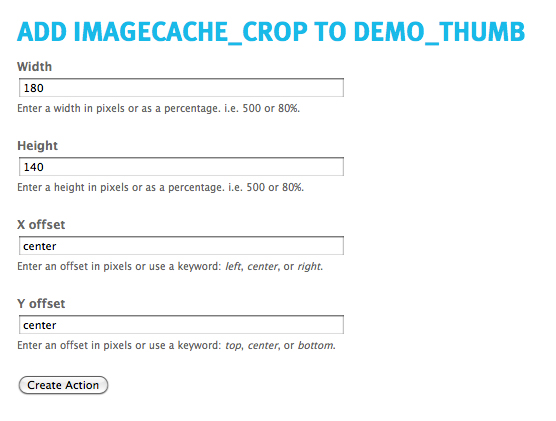
4. Cropping - Now that we have the image scaled down to the proper size we need to crop it at our exact dimensions. So click New Actions and choose Add Crop. Now you can fill in your exact dimensions. You can see an example of mine below.
Now that we have our thumbnail preset created, we need to display it.
7. Adjusting default views to use our ImageCache Thumbnail
Views gallery also comes with 2 default views that dictate how your gallery is displayed. One is called Gallery and the other Gallery List.
Since we want to effect how each individual gallery displays, we want to edit the Gallery view.
1. Navigate to Site Building > Views > List and you should see a view called Gallery. Click the edit button to the right.
2. Again, I'm assuming you have experience with Views before so this should look familiar. The first thing we want to adjust are the Fields. By default this view comes with three fields. The image, the image title, and the post date. For the sake of keeping things simple, I removed all of the fields such as Date posted and Image title and Thumbnail. To remove a field, click on it and scroll to the bottom and click remove
IMPORTANT: When making any changes in a view with multiple displays, make sure you are only making changes to the display you want to by overriding those values. For this demo, I am going to make all of the changes to the default display, which will then filter down to all other displays.
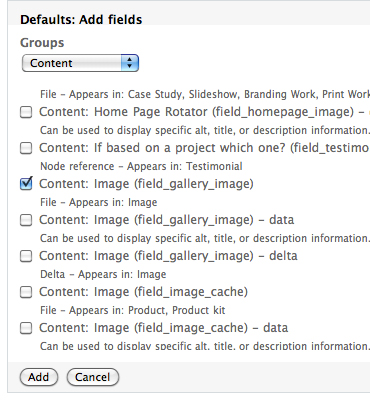
3. Adding back the thumbnail with our custom imageCache preset - Once all fields are removed, click the small plus button directly to the right of the Fields area to add a field.
Scroll down and you should see a drop down with the label Groups. Click it and choose content from that list, which will filter your choices down. Now, the one you're looking for is "Content: Image(field_gallery_image)" Check that box and click add.
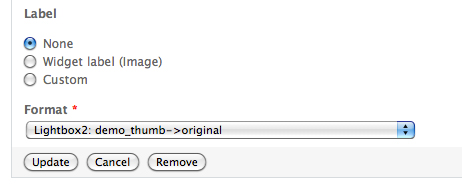
4. Now you get this long list of options, but really there is only two you need to worry about—scroll down to the bottom until you see the spot for the Label. It's probably set on Widget label, which you don't want. Choose none for this demo.
5. Directly under label you will see Format* and a drop down box below it that probably has Generic files by default. We need to change that to our ImageCache preset. Click the drop down and look for something along the lines of the image below.
6. We now need to add the Edit and Delete fields so we can edit or delete the image right from the gallery. DO NOT SKIP THIS STEP TRUST ME. Hit the plus button again next to the fields section and select Node from the drop down and put a check next to Node: Edit Link, and Node: Delete Link. See the screenshot below.
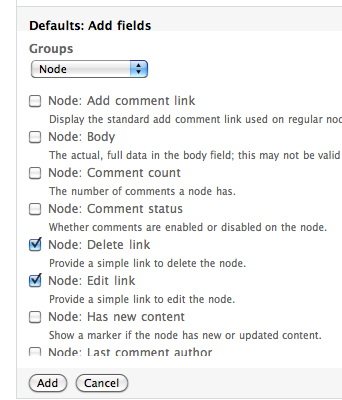
7. Remove the label from the Delete link, then scroll down and enter Delete in the Text to Display Field. Save it. Do the same exact thing for the Edit link.
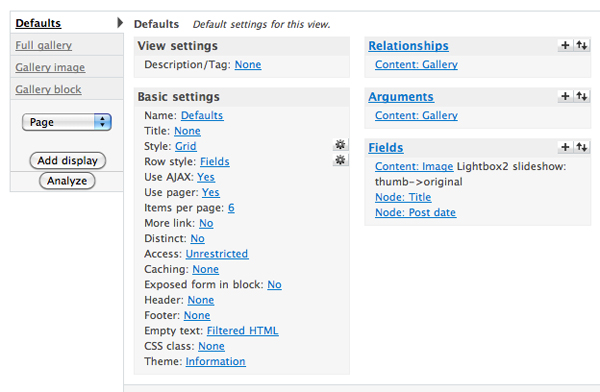
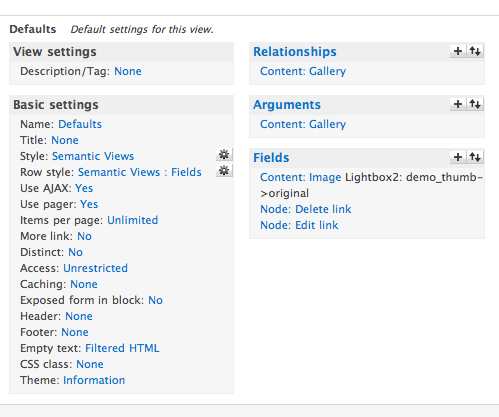
8. One last step is to make sure the items per page is set to 0 so that your gallery won't stop at 6 images. Click on the six enter a 0 for unlimited and you're good. Your final view should look like the image below.
Styling with Semantic Views
Now that we have the functionality working, let's do some styling. First we need to download and enable semantic views, this will give us more control over the output of our view.
1. Navigate to Site Building > Views > List and edit the Gallery view.
2. Now that we are editing the view, we need to change the style and row style to use semantic views. Both of these options are under the Basic Settings seciton.
3. Click on the link next to Style, which is probably set to unformatted. Choose the Semantic Views radio button and click update.
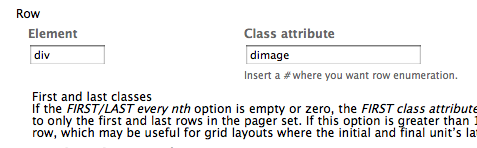
4. It will then direct you to the settings page. The only change we need to make is to the ROW element. This row element is a wrapper for each result returned, in this case each image. I set the row element to be a div with the class if dimage. View the settings below.
5. Now click on the link to the right of Row Style:, the default is probably set to fields. Change that to Semantic Views: Fields. This will allow you to add specfic classes to each field. I did not need to add any field specific classes because I was only using an image, but if you are using multiple fields like an image with a description and some other text fields this will come in handy.
Pretty up our Drupal Photo Gallery with CSS3
Remember the class dimage is our wrapper. We want a three column layout so we will give our dimage wrapper a width and float them left adding some margin to separate them.
.dimage {
  width: 182px;
  float: left;
  margin: 0px 22px 20px 0px;
}
Now let's add some styling to the thumbnail. Since we only have one image in each dimage wrapper we can use .dimage img to select the image. We are also using a bit of CSS3 to apply a box shadow and transition.
.dimage img {
  background: #ececec;
  border: 1px solid #ccc;
  padding: 6px;

  -webkit-box-shadow: 0px 2px 10px #cccccc;
  -moz-box-shadow: 0px 2px 10px #cccccc;
  box-shadow: 0px 2px 10px #cccccc;

  -webkit-transition: all .2s ease-in-out;
  -moz-transition: all .2s ease-in-out;
  -o-transition: all .2s ease-in-out;
  -ms-transition: all .2s ease-in-out;
  transition: all .2s ease-in-out;
}
Here is the CSS when the dimage div is hovered over. Remember we added a CSS3 transition to all properties, so they will all be animated on hover. We are essentially removing the effect we applied above on hover.
.dimage:hover img {
  background: #fff;
  border: 1px solid #fff;
  padding: 6px;

  -webkit-box-shadow: 0px 0px 0px #cccccc;
  -moz-box-shadow: 0px 0px 0px #cccccc;
  box-shadow: 0px 0px 0px #cccccc;
}
Here is the complete CSS
.dimage {
  width: 182px;
  float: left;
  margin: 0px 22px 20px 0px;
}

.dimage img {
  background: #ececec;
  border: 1px solid #ccc;
  padding: 6px;

  -webkit-box-shadow: 0px 2px 10px #cccccc;
  -moz-box-shadow: 0px 2px 10px #cccccc;
  box-shadow: 0px 2px 10px #cccccc;

  -webkit-transition: all .2s ease-in-out;
  -moz-transition: all .2s ease-in-out;
  -o-transition: all .2s ease-in-out;
  -ms-transition: all .2s ease-in-out;
  transition: all .2s ease-in-out;
}

.dimage:hover img {
  background: #fff;
  border: 1px solid #fff;
  padding: 6px;

  -webkit-box-shadow: 0px 0px 0px #cccccc;
  -moz-box-shadow: 0px 0px 0px #cccccc;
  box-shadow: 0px 0px 0px #cccccc;
}
All Finished!
If you followed all of the instructions correctly, you should have a working gallery that allows for Bulk uploading, Lightbox2 Integration, Views compatibility, ImageCache Presets, and Edit/Delete Buttons.
Feel free to Bookmark this page to use it as a reference in the future.
If you like this post, share it on facebook or twitter below! Don't forget to Subscribe to our RSS Feed
- Log in to post comments